
From February 2024, services like Gmail or Yahoo Mail will require DMARC settings from senders. Especially those sending bulk messages and newsletters.
To improve email delivery and increase results for message recipients, your domain settings need to be optimized. Gmail or Yahoo’s email servers can mark an email message as SPAM or stop it entirely due to missing settings. In this guide, we cover basic optimization and domain settings for smooth email flow.
A free tool that can improve classification of specific messages or reveal why a message was marked as SPAM is called Mail Tester. The tool checks the score for a specific email message and suggests how to improve your sender reputation and email delivery.
SPF
An SPF record (Sender Policy Framework) is a type of TXT record that contains information about which SMTP servers (IP addresses) are authorized to send email from a specific domain. The goal of SPF is to limit sender spoofing in email and prevent spam.
How to set up an SPF record
If you send email messages from WebSupport, your SPF record will look like this: v=spf1 a mx include:spf.websupport.se ?all
This record says that smtp.websupport.se is the authoritative SMTP server for your domain. Since the IP addresses the SMTP server sends from (smtp.websupport.se) are also in the SPF record, the message will be delivered.
If the message is sent via a different SMTP server, for example smtp.gmail.com, the email loses points in its evaluation and will likely be marked as spam.
SPF is a TXT record, so you can set it up in DNS > TXT.
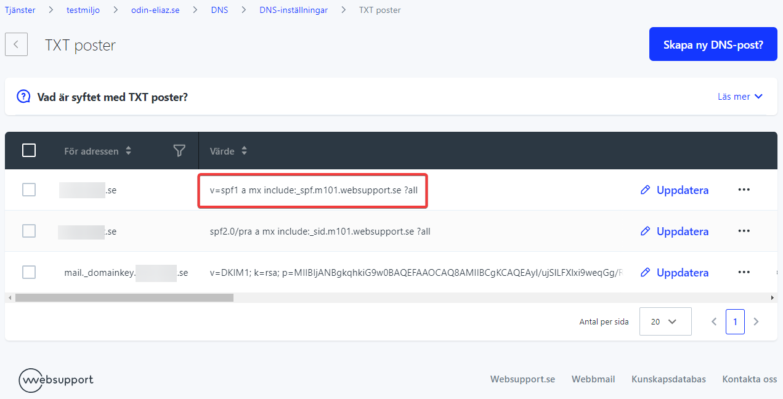
How do you edit TXT records? »
Changes made through our DNS settings will only take effect if your domain has name servers set to WebSupport (ns1.loopiagroup.com). When you set up the SPF record, make sure you’ve set Name servers to WebSupport. If you use your own name servers or another provider’s NS, ask them to add an SPF record in their DNS manager.
Combining multiple SPF records
You can only have one TXT record for SPF in your DNS. If you need to enable sending from multiple servers, you must combine SPF records into one.
For example, if you need to add a Google SPF record to our SPF record, you can do it like this:
- Original record: v=spf1 a mx include:spf.websupport.se ?all
- New record: v=spf1 a mx include:spf.websupport.se include:_spf.google.com ?all
Information is separated by spaces. The SPF record in our example authorizes WebSupport and Google servers to send email. Other servers are not allowed and will not pass SPF checks.
DKIM
DKIM – authorizing outgoing email using a signature is enabled by default on web hosting. In this case, every email sent from our servers is verified.
How to set up DKIM
The first step is to enable DKIM email authentication, which can be turned on/off at the domain level.
- Log in to your Control Panel
- Click your domain in the services overview under Domains
- In the left panel, click the Email >> Overview section
- Go to Domain security
- DKIM – select your desired setting from the list – on or off
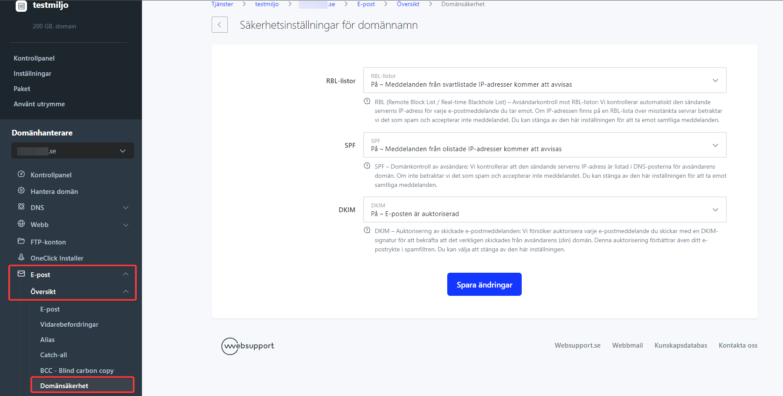
The second step is to add DKIM to your domain’s DNS records. DKIM is added to DNS records automatically after domain registration or transfer, within 24 hours. You can find it in DNS records in the TXT records category.
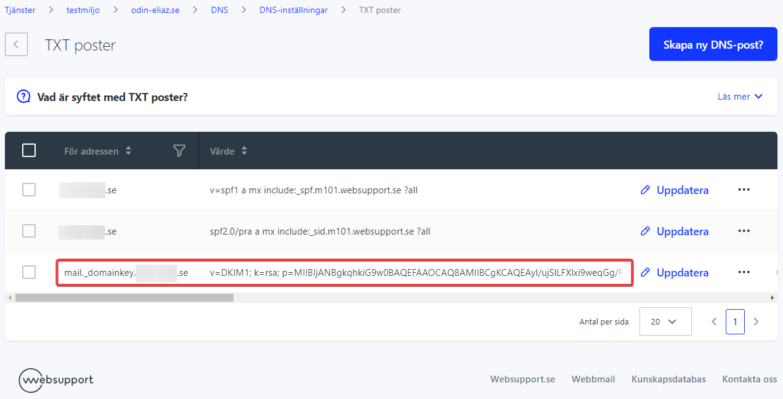
If DKIM is not visible in the TXT records list, you can add it again:
- Open DNS in the left panel under your domain
- Click Quick settings
- Click WebSupport Mail – in the record overview you’ll see a record with a name that starts with: mail._domainkey.
- Copy this record and add it to TXT records. If you set DNS records in WebSupport, just click Continue and the record is automatically added to TXT records.
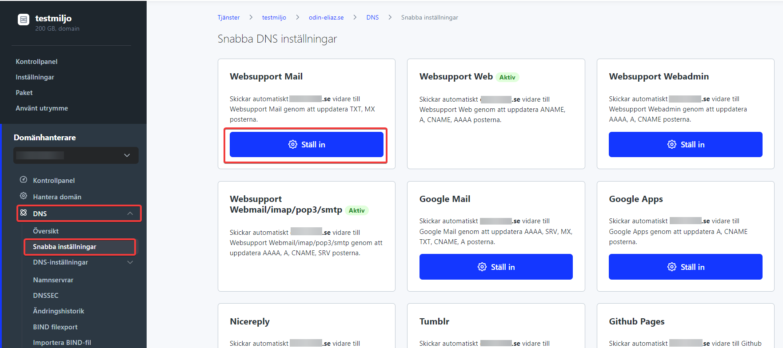
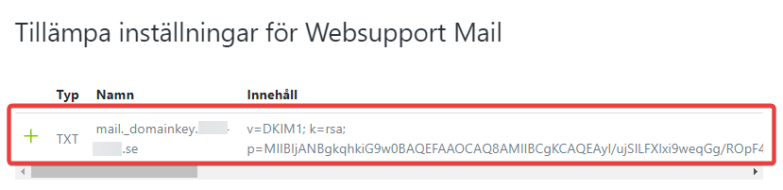
If DKIM doesn’t show in Quick settings, contact our support.
If you send email from WebSupport and also from another provider, it’s possible to set up multiple DKIM keys, but they must be separated using different selectors, for example: mail._domainkey.yourdomain.se and mail1._domainkey.yourdomain.se. Ask your email server provider to generate DKIM with a different pointer than mail._domainkey.
DMARC
DMARC is a specification that links the two authentication technologies SPF and DKIM together and tells the receiving server which rules should apply to messages from a specific domain.
DMARC builds on these two technologies, combines them, and has the following key functions:
- It’s based on the sender address in the email message’s From header and tries to verify that the message was actually sent from the specified domain.
- It uses SPF and DKIM – if the sender’s domain SPF is satisfied or the email has a verified DKIM signature, it considers it trustworthy.
- It defines a policy for failed emails – how to handle those that fail DMARC verification.
- It lets you set up feedback – where and how to send DMARC result messages for emails (claimed to be) sent from a specific domain.
- You can set it to only apply to a portion of emails and roll it out gradually.
- DMARC is published by the owner of the sending domain and authenticates the email recipient
DMARC is not just a separate technology – it builds on existing SPF and DKIM. With them, the recipient can check if the email has followed the rules for sending from the domain according to SMTP mail and from which domains it has valid signatures. This information is then sent to the DMARC module, which compares and checks if domains verified in SPF or DKIM have anything in common with the specified domain in the From header. If at least one part is true, according to DMARC, you can trust that the email was really sent from the given domain.
From February 2024, email providers like Gmail and Yahoo must set up a DMARC record for bulk email senders.
How to set up DMARC
We enable DMARC by adding a TXT DNS record
Address: _dmarc
Text: v=DMARC1; p=none; rua=mailto:report@exampledomain.se
TTL: 3600
Within DMARC you can set several parameters to change its behavior.
“v” – protocol version, currently only DMARC1 is used
“p” – the recipient’s desired action, that is, how the recipient should handle the message that failed SPF and DKIM checks. The options are:
“none” – the recipient takes no further action. By default, it performs SPF and DKIM checks and, based on these and other results, then evaluates the message’s trustworthiness and handles it according to its own rules
“quarantine” – the recipient gets a message marked for quarantine and handles it according to its own rules, for example by moving it to spam
“reject” – in this case, the recipient refuses to deliver the message, that is, it doesn’t reach the destination mailbox at all.
“rua” – the email address to send aggregate reports to about whether any emails from your domain have failed DMARC checks. Used to send summary messages for email verification and provide an overview of sending. This combines data within a group of emails.
“ruf” – email address to send reports to, used to send detailed messages about specific email verification errors. Provides specific details when an email verification error occurs. This means the notification is sent for each email specifically and shortly after the failed send.
Generate a record via MX Toolbox
If you don’t want to make a mistake when setting up a DMARC record, it can also be easily generated at MX Toolbox.
- Open the MX Toolbox page.
- Enter your domain name and click “Check DMARC record”.
- On the left side, set individual parameters according to the list above, and on the right side, DMARC automatically updates based on the parameters you enter.
Copy the finished “suggested record” and create a new TXT record in your Control Panel. If you haven’t created a TXT record yet, use this guide.
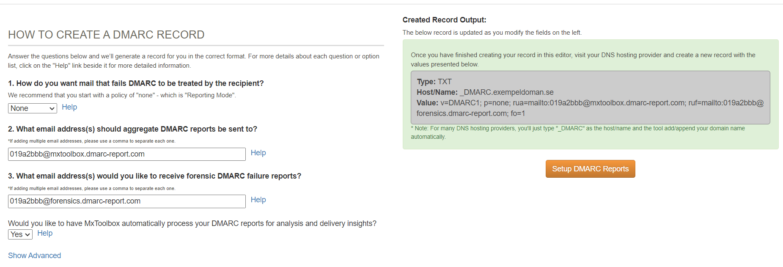
You can also use MX Toolbox to verify the DMARC record you’ve created once you’ve added it with us.

Other recommendations
When evaluating an email message, other criteria are also included, such as attachment size, text content, where links lead, and more. Mail Tester, which also tests content criteria in the email message, can help with the settings.
Recommendations for improving deliverability are also found in the article from Sendgrid.

