If you want to test whether a website works without an active domain, or if you decide to migrate an existing website to a new server and don’t want to change DNS records before checking it first, there are two simple tricks to force your browser to load pages without relying on DNS or making changes. In this guide, we will go through both methods.
Preview URL
To test a website without a domain with us, you can use a so-called Preview URL. It looks like this:
http://d.r101.wbsprt.com/dittdomän.tld/
When using the URL, all you need to do is insert your domain name after yourdomain.tld and open it in your browser like a regular page.
Edit host file
This method is recommended for testing WordPress and other more complex applications. The hosts file is stored on your computer and contains information about which IP address the browser should use to find the site. If you have already set up a new web host, you just need to update the entry in that file.
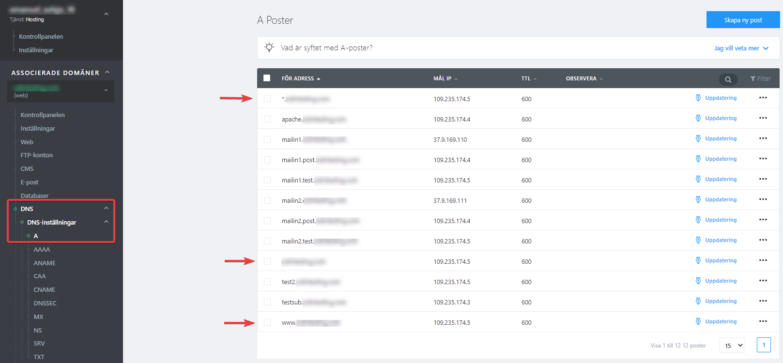
Follow these steps to find the IP address you can use to set up the hosts:
- Log in to your Control Panel »
- Click on the relevant domain in the list of services
- Select DNS from the left-hand menu and click on the “A” tab.
- Find the DNS record for yourdomain.tld, www.yourdomain.tld, or *.yourdomain.tld.
Before making this setting, we recommend closing all browser windows to ensure that the hosts file edit takes effect.
Linux and macOS
The best way to work with the Hosts file is by using the Terminal app, which can be found in the Utilities folder on macOS. You can also search for and launch Terminal using the Spotlight feature. On Linux, you can easily find it in the Applications folder.

Once you have launched the Terminal, enter the following command:
sudo nano /etc/hosts
Then press ENTER, and you will be prompted to enter a password. Once you have entered your password, the file will open for editing in the Nano text editor. Add any new entries at the end of the document. You can navigate to the end using the arrow keys on your keyboard. The current cursor position is displayed in gray. The document will look something like this:
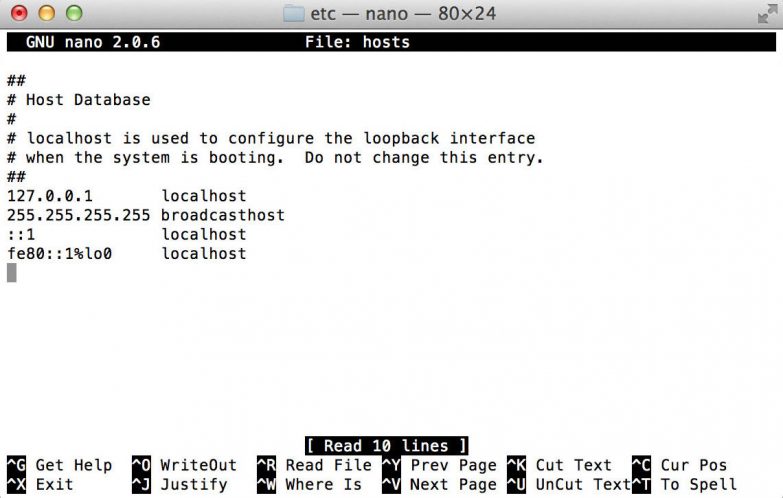
In the Hosts file, enter the IP address on the new line, which you found following the steps at the beginning of the manual. Then press the Tab key and type your domain name in the format yourdomain.tld www.yourdomain.tld. These addresses are already separated by a space. However, when using a tab, the IP address and the list of domains must be separated by a single tab, and there must be no extra spaces. Example:
37.9.175.3 [tab] yourdomain.tld www.yourdomain.tld
After editing, press Control + O to tell Terminal to save the file. Then press ENTER to confirm saving, and press Control + X to exit. As a final step, you need to “flush” the DNS cache to ensure the changes take effect. Enter the following command:
sudo killall -HUP mDNSResponder
All done! The page loads correctly from our server.
Windows
It looks a bit different on Windows devices. You do not make the change via the Command Prompt (terminal). You can locate the file manually at the following location:
c:/windows/system32/drivers/etc
Open the file as an administrator (right-click > Open as administrator). Insert a new line in the Hosts file, enter the IP address you found following the steps at the beginning of the manual, press the Tab key, and then type your domain name as shown below.
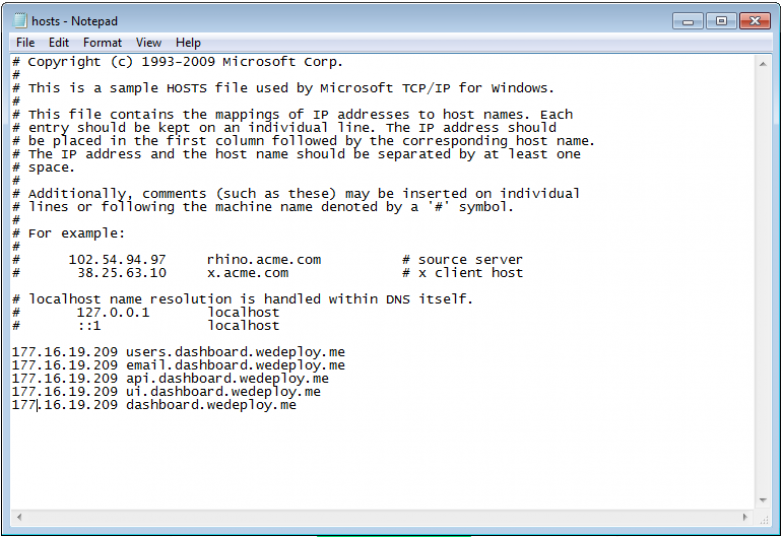
Be careful with spaces: the IP address and the list of domains must be separated by a tab, and there must be no extra spaces anywhere. Example:
37.9.175.3 [tab] yourdomain.tld
37.9.175.3 [tab] www.yourdomain.tld
Save the file and clear your web browser’s cache.
All done! The page loads correctly from our server.